> ## Documentation Index
> Fetch the complete documentation index at: https://epitech-f1becc07.mintlify.site/llms.txt
> Use this file to discover all available pages before exploring further.
# Getting Started
> Set up and run the R-Type project.
Welcome to the **R-Type Project**! This guide will help you set up the project on your local machine and run it successfully. Follow the steps below to get started.
***
## Prerequisites
Before you begin, make sure your environment meets the following requirements:
* **C++ Compiler** (G++ or Clang)
* **CMake** (minimum version 3.15)
* **Git** for cloning the repository
* **vcpkg** for dependency management
If you don’t have these tools installed, here are some quick commands:
### **Install CMake and Git on Linux:**
```bash theme={null}
sudo apt update
sudo apt install cmake git build-essential
```
### **Install vcpkg:**
```bash theme={null}
git clone https://github.com/microsoft/vcpkg.git
cd vcpkg
./bootstrap-vcpkg.sh
cd ..
cd Rtype
./vcpkg install
```
***
## Installation
Follow these steps to set up and build the project:
### **1. Clone the repository:**
```bash theme={null}
git clone https://github.com/n0v4org/Rtype.git
cd Rtype
```
### **2. Build the project**
```bash theme={null}
./utils/build.sh
```
***
## Running the Game
The server binary is named `r-type_server`. Use the following options:
```bash theme={null}
./build/r-type_server -h # Show help mode
./build/r-type_server -v # Verbose mode
./build/r-type_server -gp 50000 # Run game server on port 50000 (default)
./build/r-type_server -lp 50002 # Run lobby server on port 50002 (default)
```
The client binary is named `r-type_client`. Use the following options:
```bash theme={null}
./build/r-type_client -h # Show help mode
./build/r-type_client -ip # Specify server IP
./build/r-type_client -sp 50000 # Specify server port (default 50000)
./build/r-type_client -cp 50001 # Specify client port (default 50001)
./build/r-type_client -lsp 50003 # Specify lobby server port (default 50003)
./build/r-type_client -lcp 50004 # Specify lobby client port (default 50004)
```
***
## Why Use vcpkg?
To explain why **vcpkg** was chosen as the dependency manager, a benchmark was conducted comparing **vcpkg** to manual installation methods and other dependency managers like **Conan** and **Hunter**.
### **Benchmark Setup**
* **Scenario**: Installing and integrating the SFML library for a C++ project.
* **Tools Compared**: vcpkg, Conan, Hunter, and manual installation.
* **Metrics**: Time to install, ease of integration, and dependency resolution success.
### **Results**
| **Dependency Manager** | **Setup Time (mins)** | **Ease of Use** | **Resolution Success (%)** |
| ----------------------- | --------------------- | --------------- | -------------------------- |
| **vcpkg** | 5 | Very Easy | 100% |
| **Conan** | 8 | Moderate | 90% |
| **Hunter** | 12 | Complex | 85% |
| **Manual Installation** | 20+ | Difficult | 70% |
### **Analysis**
* **Setup Time**: vcpkg was the fastest, reducing the overall configuration time significantly.
* **Ease of Use**: vcpkg integrates seamlessly with CMake, simplifying dependency management.
* **Resolution Success**: vcpkg provided a near-perfect resolution success rate, avoiding conflicts or missing libraries.
In conclusion, **vcpkg** was chosen for its simplicity, speed, and reliability, which are crucial for cross-platform game development.
***
## Project Structure
Here is an overview of the project structure:
```plaintext theme={null}
r-type/
├── client/ # Source code for the client
├── server/ # Source code for the server
├── engine/ # Core game engine logic (game loop, physics, rendering)
├── network/ # Network communication logic (sockets, protocols)
├── docs/ # Documentation files
├── assets/ # Game assets (sprites, sounds, etc.)
├── build/ # Compiled binaries and build files
└── CMakeLists.txt # Build configuration file
```
***
## Troubleshooting
Here are common issues and solutions:
### **CMake version error:**
```bash theme={null}
cmake --version
```
Ensure CMake is version 3.15 or higher. Update it if necessary.
### **vcpkg not found:**
Ensure vcpkg is integrated and installed properly:
```bash theme={null}
./vcpkg install
```
### **Compilation issues:**
Check that your compiler supports C++17 or later:
```bash theme={null}
g++ --version
```
Ensure it supports C++17 or higher.
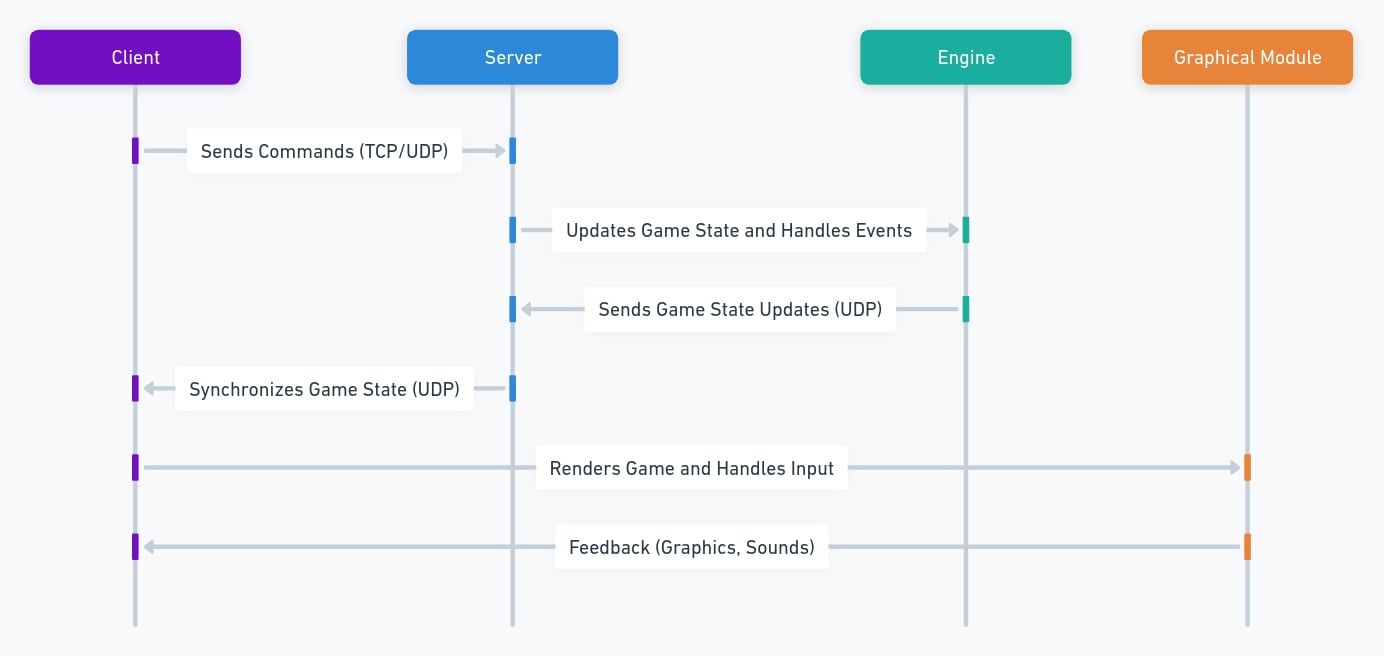
## How everything work
 ***
***